Sunday, February 28, 2010

I Like to Twist


Today is the last day of February. I think that it is safe to say that the blog, after its first full month has been consistent and productive. I will confess that I like to take standard dishes and give them a bit of a twist. This morning I decided to do a twist on steak and eggs. We had made some shredded beef sandwiches on Saturday night from our meal exchange and had a bunch of leftovers. I decided to use some of this shredded beef and one of the rolls from Saturday nights meal to have my own little steak and eggs. In an effort to reduce the carb intake I cut out the middle section of the roll by making two cuts along the length of the bun to leave me with three slices. I spread a thin layer of butter on the bun slices and placed them in the hot pan with my egg.


After assembling the sandwich on my plate I took a cereal bowl and placed it over the top of the sandwich to melt the cheese. I knew if I melted the cheese while the egg was still in the pan my egg would over cook. The cover to melt technique is one I learned from Betty Crocker back in college. Betty sure knows how to cook!!


The final twist to the morning was to take some bake sweet potato and dice it up. That went into a hot pan with a little butter to brown up and heat up. Really, what is steak without some potatoes? The moral of the story is that you do not have to stick with your standard dishes. Stretch your cooking wings and go for something different. It is fun to take a standard dish and give it your own twist. I think you will like it.

Saturday, February 27, 2010

It is good to be crusty!!


After work today I was hungry and really needing something more than just a snack. I had only had popcorn for lunch, so I was needing some protein to get me through the afternoon lull. I had some chicken that I was unthawing for lunch that just was not quite ready for the noon time meal. I decided to cook up a slice of bacon in a pan and then saute some quartered mushrooms and red onions in the bacon grease. For the chicken I went very simple. First I pounded out my chicken breast, must do for even cooking, and then just sprinkled on a little sea salt, pepper, and parmesan cheese. As I was finishing the cooking of the shrooms I looked through the fridge for something else to crustify my chicken, enter blue cheese. I know that not everyone is crazy about blue cheese, but I have to say I think it can grown on you. I think that it is one of those things that you enjoy more with age!! After removing the mushrooms and onions from the pan I added about a tablespoon of EVOO and then the chicken breast. The parm and blue cheese made a nice golden brown crust on the exterior of the chicken. I allowed the pollo to cook for about four minutes before flipping and cooking on the other side for another four. The end result was an aromatic and flavorful crusty breast of chicken. I made sure to allow the meat to rest for a couple minutes before diving in. The whole dish was finished with some green onion for extra flavor and color. I refrained from making any sides because this was not supposed to be a full meal, just a snack. The bottom line is that you can crust anything, and I think that everything is better with a little crust!! Crusty bread, crusted fish, peppercorn crusted steak... You cannot deny the joy that comes from a great crust. The next time you are at a loss of ways to prepare your protein, get crusty!! (Sorry for the lack of photos, but I wasn't planning on blogging this snack.)

Friday, February 26, 2010

Sometimes you have to break a few eggs


If you want to make a good omelet, you have to break a few eggs. The omelet is one thing that I will admittedly never order at a restaurant. I am always disappointed by the price and quality of the omelets that I order at breakfast establishments. It was not until recently that I really started making my own omelets either. I have to say that I was a little afraid of them. They seem to always end up in a sticky lump of egg and fillings. I figured it was just as easy to make some scrambled eggs and call it good. Alton Brown, my favorite man on Food TV, had a show one night on the omelet. I was glued to the entire show like an egg to an under lubricated pan.


The thing that I have come to love about the omelet is the customization factor that you have with them. You can prep countless toppings/fillings and allow yourself (or your weekend house guests) to pick and choose from the buffet of goodness. Here is how I make my omelets. The first thing is to prep all of your toppings. The actual cook time on the protein roll ups is very quick so you cannot be messing around with chopping onions or shredding cheese. Once I am confident in the toppings that I have ready I scramble my eggs.


I have the perfect cast iron skillet for a three egg omelet. This pan is a part of my magic because it is smooth as a babies bottom and has a great lip to hold the eggy goodness in. My ratio is 2-3 eggs and 1 T of milk. One key here is to have warm eggs. This allows for quicker cooking on your eggs. I make sure that my pan is nice and warm (medium-high for about 3-5 minutes) before I spread a light coating of butter. The easiest way to do this is the wrap a tablespoon of butter in a paper towel and rub it liberally over the pan.


Dump your eggs onto the pan and spread the eggs out evenly with a spatula to assure even cooking. Once the edges of the omelet begin to firm up slide your spatula under the omelet to release it from the pan. Fill the semi-cooked omelet with your choice of fillings and fold over the two sides for a perfect tri fold. I like to sprinkle a few more items on top and then remove to a plate to enjoy. I always wait to salt and pepper my eggs to just before I add the fillings. If all has gone well you will have a nice lightly browned crust and a gooey creamy center of your omelet. I really think that the omelet is a lot like a flourless crepe. Who says you can't have a sweet filling for your omelet? I know the omelet may scare some, but I am certain that with some practice you can crank out perfect omelets that will have you turning your nose up at the next breakfast menu you look at!!

Wednesday, February 24, 2010

Old School and After School


What was it about coming home from school that made you always want to have something to eat. I know that my best bud John Mulhair and I used to sit on my couch and eat chocolate chips straight out of the bag as we watched "Dennis the Mennace." Something about spending your day within the confines of a school building produces a hunger that rivals a day of swimming. The trick about the after school snack is that there is not a lot of time between the snack and supper, but there is enough time for you to ruin your appetite. Now that my kids are in school, I know that once they walk in the door from their day at school they are looking for something to satiate their hunger. I decided that popcorn was the munchy of the day because it would provide both the salty and the sweet. The thing about popcorn is that there are two, maybe three, kinds of popcorn that whip all other popcorn. Old school stove top popcorn in the big metal kettle, movie theater popcorn, and (maybe) fair kettle corn put all other popcorn to shame.


My wife's family has been making stove top popcorn for ages up at their summer cabin. They have the most amazing kettle that has seen more presidents than I could probably name, but produces the best popcorn you have EVER had. I think there has to be something about the butter and oil that they use, but Grandma Bonnie and the aunts swear by the kettle. A few years ago our neighbors encouraged us to abandon the standard microwave popcorn and enter the new, and far superior, hemesphere of stove top corn. Once I popped, I couldn't stop!!


If you have a large stock pot, which if you do not you must get one tomorrow, you can make "homemade" popcorn. Here is what you need to do: Head to your local grocery store popcorn aisle (not Target though because they only stock yellow popcorn) and pick up a bag of Jiffy Pop WHITE popcorn. Friday night you dust off the large stockpot that you have not used since your last neighborhood pasta feed and make your family some popcorn that will make you never want to eat popcorn out of the microwave again.


The process is simple: Place your stockpot on a burner that is set at medium-high. Add 1 1/2 to 2 T oil of your choice. Allow the oil to heat for about a minute before adding 1 1/2 T of butter. The butter will melt quickly so I always like to have my corn pre-measured and ready. For this batch of kettle corn I added about 2 T of brown sugar with the butter and allowed that to melt down before adding the corn. Once I dump the corn in I like to give the pan a big swirl to evenly disperse the kernels about the bottom of the pan.


When that first kernel pops you add the lid and let the magic happen. As the popping slows I like to grab a large spoon and give the kernels a few stirs to make sure that I maximize popping while trying to minimize the burning. It is your call on when you want to dump the corn from the kettle into your pan, but I like to wait until the popping is VERY sparse. The goal is always to end up with as few "old maids" as possible in the bottom of my bowl. I usually just add a little seasoning salt and some regular table salt. If you are feeling indulgent add some more butter to the bowl, but I think it is usually good. This makes a great snack to bring to the park or enjoy on the couch during your favorite flick!! Much like the french press, popping your corn on the stove and not in the microwave does take a little more work, but the results are WELL worth the effort. Try it this weekend and I think you will find yourself poo pooing that stuff that comes in the pre-wrapped plastic bags!!

Tuesday, February 23, 2010

No Contest


There are certain things that you really just need to spend a little more money on in your kitchen and avoid marketing gimmicks. The knife block set is one of the worst traps that is set for knife buyers. You think, "Look at all the knives I get for this price. Why would I spend $100 on two knives when I can get six for the same price?" The answer is simple, you don't need six knives. There are really only three knives that you need in your culinary quiver: the chef's knife, a paring knife, and a bread knife. You can do everything that you need to do with these three knives. The knife block is full of knives that you will only use because you do either feel bad that you never use them, or because the other similar knife is dirty and you don't want to wash it.

The chef's knife will chop, cut, dice, shave, and trim everything from steak to cheese. Invest in a great chef's knife like this Wusthoff and you will never regret it, unless you buy one with the wrong handle. There are many times that I choose to chop something just so that I can use this knife. The paring knife allows you to cut anything small that requires precision. Trimming mushrooms. Slicing strawberries. Coring apples. The paring knife can cut down any small job that you have for it. The bread knife (or serrated knife) is the only other knife that you need. If you purchase a great serrated knife you will be able to use it to evenly slice your fresh bread or use it to carve your Thanksgiving turkey. There are just certain jobs that the chef's knife and the paring knife cannot do, thus the need for your serrated knife.

I know that great knives cost money. I am as cheap as they come, but I know, from experience, that when you invest the money in great knives you will be rewarded with cutlery bliss. You don't need a knife that will cut a brick or a pop can, but you do need one that is made out of great steel and feels great in your hand. Take some time to "air chop" if you need to, but find the knife that is works best for you and buy it. This is an investment that you will not regret. Don't be a blockhead. By your knives separate and save yourself the unnecessary knives that will never come out of the block.

*Notice I have yet to obtain my good bread knife!!*

Monday, February 22, 2010

Go To Cakes


The more cakes that I have made, the more I have realized that you need to have some "go to" cakes that you can use for about anyone. Today is a great friends birthday and I had a GREAT idea for his birthday cake. He used to be a helicopter pilot in the military and served in Iraq, so I wanted to make him a helicopter cake. The only problem is that there was no way that I had the time to make it for him. I really didn't want to go with a traditional cake that would be simple and easy. I wanted to make him something unique and special. I have used my t-shirt mold as a "go to" cake before, but I wanted something new. The t-shirt is great because you can easily make a jersey of any guys favorite sports team. I was just feeling like it was a been there done that kind of design.


(This is a cake I made 3 years ago for a friend who is a HUGE Bills fan.)

Joe went to the University of Nebraska, and like most Huskers, he is a die hard fan. His entire bathroom is Huskers stuff!! It makes me a little sick to my stomach, but I still like the guy. Rather than going with the jersey I thought it would be fun to try and make a hat. I felt like it was new and fresh. The thing with making cakes is trying to think of creative ways that you can use your pans together to make something completely new. This cake was made out of one 8 inch round and a skirt mold for a Barbie cake. The bill was formed out of gum paste and cardboard. Looking back at it, I think that it turned out almost exactly like I wanted it to. The thing that I think I am most excited about is having another "go to" cake design that I could use in a pinch for almost anyone. I am a firm believer that you need to develop arrows that you can keep in your cooking quiver and pull them out at a moments notice and hit a bullseye. Get creative. Think outside the cake mold. Try something new. You might surprise yourself!!

Sunday, February 21, 2010

Friends and Substitution


In my opinion, you cannot substitute anything for a great friend. In the same way, there are certain items in the kitchen that you cannot substitute for, however there are countless things that have similar counterparts that you can easily substitute. I think many people find the apple sauce for vegetable oil to be one of the best substitutions. This blog posting is for my dear friends TJ and Jodi who were visiting this weekend, and for whom I made the French Toast. TJ and I lived together in college for awhile and he became accustomed to having me cook for him, so whenever he is around I always like to make something special. Friday night I had fried up some fish for us and had some leftovers that were still in the fridge. We all had separate plans for dinner, but were in that 4:00 pm void where you REALLY need something to carry your stomach to the dinner table. I decided that I would make us all some walleye/northern/crab cakes. It would use up some of my leftovers and be enough to carry us through to our dinner plans. I had a bit of a problem though, I used two key ingredients for the cakes in our morning meal.


There I was in the kitchen with fish cakes on the brain, but lacking eggs and onions. What was I to do? I decided to improvise. I used celery instead of the onion and EVOO for the egg. So here is what was in the bowl: diced celery, parm, diced smoked jalapeno, crab, walleye, northern, corn meal, bread crumbs, EVOO, salt, pepper, paprika, and cayenne. I mixed it all together until it began to bind up. The mix was then joined together into 5 nice patties and pressed into some more bread crumbs to coat. They were chilled slightly to keep them together. I fried them up in some EVOO and a little bacon grease. A couple minutes each side until they were golden brown (medium-high heat). For the tartar sauce, which I am not usually a big fan of, I used a little mayo, some dijon mustard, sweet relish, smoked jalapeno, lime juice, and paprika. It was all whisked together and used to top each of the cakes. I think the best part of the whole cooking experience was the response that TJ and Jodi had after eating these little guys. Just because you don't have EXACTLY what you need does not need you have to abandon ship on your recipe. Get creative and see if you can't find yourself a new substitution. You can't substitute friends, but you can almost always substitute when cooking.

Stuffed French Toast


This weekend some of our great friends were in town visiting us. TJ's favorite breakfast is French Toast, so I naturally wanted to make him some killer French Toast on Saturday morning. I think that there are some real keys to making great French Toast. The first thing that you need to do is plan ahead and select a great bread that will give you a great texture and excellent flavor (I chose a nice egg challah this morning). Once you have your bread you need to slice it the night before and allow your bread slices to dry out a bit overnight. The bread will act like a sponge when it is dry and soak up more of the egg mixture.


For my egg mix I like to use about 1 egg per 2 1/2 slices of bread, 1 tsp milk or cream, 1/2 tsp cinnimon, and 1/8 tsp nutmeg per each slice of toast. I place it all in a large bowl and whisk to until the mix is smooth. I think that an emmersion blender works great for the blending of your egg mix. Once I have my mix smooth and creamy I dump it into a 8X8 baking dish for the soaking of the dried slices. I always allow my bread to soak for 15-20 seconds on each side in the egg mix before placing it on the griddle. While your slices cook on their first side you can whip up 8 oz of softened cream cheese with 2 T of butter and 1 cup of pecans. You could also add some fruit to the filling, but I chose to add the fruit to the top of the toast. Once you turn your slices you simply need to scoop up a large dollup of the filling and place it on top of half of the slices. The cream cheese mixture will melt slightly while it waits to be topped by the other slice of toast. Once the slices are cooked through top the cream cheese halves with the non-cream cheese halves and remove from the griddle. I think that it is good at this point to slices the sandwich like toast pairs in half to make it easier to plate and eat. Since TJ was suffering from a brutal sinus cold I wanted to get him some extra vitamin C in the form of some orange slices. These particular orange slices I cut off, rather than peeled off, the outer skin to make them easier to eat. Finish it all off with a little powdered sugar and syrup and you are good to go. Stuffed French Toast is a great way to take a simple dish up a few notches without having to do a whole lot more. Don't settle for plain slices of French Toast, go gourmet. You will love it!!

Friday, February 19, 2010


Tonight we have some dear friends staying at our house and he asked that we blog about a beverage. So, here is my blog posting about the mocha martini that I put together. I have not been able to find my good camera, so the pictures are not up to par. I think that the martini is something that gives you great liberty in the kitchen, or behind the bar!! You can really take great liberties to put together a variety of flavors to create an exceptional drink. The mocha martini was kind of a no brainer for me.


I used equal parts of vanilla vodka, Vincent Van Gogh Double Espresso Vodka, espresso, Irish Cream, and creme de coco. I added a little chocolate syrup for garnish and flavor. This was all dumped over ice and shaken vigorously to combine. It produced a great after dinner/dessert drink that you coffee lovers would enjoy. I think that many of these items could be great to have around for coffee flavorings and martini making!! It is far better to invest this money in your own kitchen then make your drinks at your own leisure.


Why pay the high price at the bar when you can make a better drink in your kitchen?

Thursday, February 18, 2010

Bulk can be better


We have been participating in a meal exchange for over a year now. There are about eight different families who are involved in a once a month meal exchange where you prepare 7 or 8 batches of the same meal and then exchange it for an equal number of different meals. Sure there are times when you feel as though you have exchanged a great meal for something that is, well, not so great. That is the risk that you must be willing to make in the exchange game. Think of it like echanging money when you cross international borders. There are just times that you have to change your pesos in for dollars!! This month I chose to try a new recipe that was brewing in my head. Soy ginger pineapple pork chops with brown rice. You do not have to provide a complete meal, but you do need to provide the main pieces of the dinner.


The recipe went a little something like this: soy sauce, a little vegetable oil, cubed pineapple, shredded ginger, onion powder, garlic powder, cayenne pepper, sesame seeds, and black pepper. I dumped all the ingredients into a large freezer bag with the 5 pork chops and simply allowed for the meat to marinade until dinner. The chops were then cooked in a hot skillet with some EVOO for 2-3 minutes on each side. I made some glazed carrots and brown rice to finish off the meal. I must admit that the chops were a little salty, so I would opt for reduced sodium soy sauce if you give it a try. The marinade did make a nice glaze for the carrots. So maybe you could find some adventerous souls and start your own little meal exchange. It allows you to try new things that other people have labored over and take some of the guess work out of the question, "What's for dinner?!!?" I think you will like it.

Wednesday, February 17, 2010

Love and the Onion


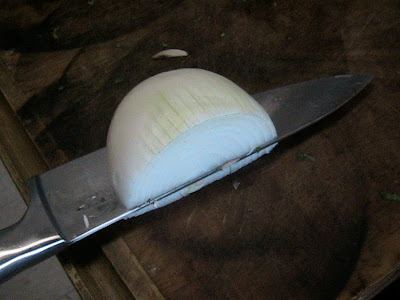
A good friend of mine once told his girlfriend (who is now his wife) that, "love is like an onion, it has many layers!" Although this is probably the LAST thing that you want to tell someone when they confess their love to you for the first time, it is a profound statement. The onion is a fascinating vegetable that has countless uses and a myriad of ways to be cut. Some people despise cutting up onions because of the tear production that often is a byproduct of the dissection. I, on the other hand, love to chop onions because of this technique that I learned a number of years ago. These three easy cuts allow you to dice a quarter of an onion in no time and leave you with uniform pieces that a perfect for almost any dish.


Once your onion is peeled and quartered you simply make 4 to 5 slices starting at the bottom of your onion quarter and moving up towards the top. Keep the knife parallel to your cutting board. Be sure to cut as close to the back of the onion as possible without cutting all the way through the onion. The root end will hold your onion together.


Next you want to make vertical cuts that are perpendicular to the cuts that you just made. I would start at the side that is furthest from you and work up the curve of the onion quarter and back down to the side that is closest to you. Again, do not cut all the way through the onion. The closer together you make these cuts the smaller your dice will be.


Finally, place your knife vertical to the cutting board and perpendicular to the cuts that you just made. Start at the end opposite the root (or at the cut end) and work down towards the root end with a nice even chopping motion. Again, the closer you keep your knife on each chop, the smaller your diced onion will be!! This may take some time to figure out, but I think that you will really enjoy the three easy steps to producing a nice uniform dice on your onions. Try it, I think you will like it!!

Tuesday, February 16, 2010

The Food Brick


I am unashamedly thrifty. I do love a good kitchen gadget or specialty tool and will pay a lot for something that I think will make my cooking more fun and enjoyable. However, I am also inventive and creative when it comes to getting around the gadgets that I think are gimmicks. For instance, I think that the panini press is a terrible waste of time and just clutters up your cupboards. You could use those resources on a much more valuable tool. So here is how the food brick works. It is really complicated, so pay attention:

Find a solid brick.
Wrap it in foil.
Use it to press down any food you need.
Wipe clean and reapply new foil as needed!!

The brick works great for pressing down panini like sandwiches. You can use it as a bacon press. You can use it to crush ice. Basically anything that you need to hold down and secure while cooking, the brick has your back!! Although you may not use it every day, it will be there when you need it.

Sunday, February 14, 2010

Makin Bacon


How can you not LOVE bacon? It is such a great meat item that is salty, crunchy, addictive, and all around delicious. You can add it to anything and have an amazing dish. Morning, noon, night, bacon is wonderful. One thing though that hinders the enjoyment of bacon is the grease. When you fry bacon on the stove you tend to get lots of splatter all over your cook top and then inevitably end up with shrunken curled up pieces that can become burned very easily. Also, you can often only fry up four to five pieces at a time so you have to keep pieces warm in the oven while the others bake. Then you have to find a tin can or other metal vessel to dump your grease into. The solution is found in your oven.


Take a rimmed cookie sheet and line it with parchment paper. Place a cooling rack on the paper and lay out as many pieces of thick cut bacon as you can fit on your cooling rack. Your cookie sheet goes into the middle of a cold oven. Turn your oven on to 375 degrees and cook for about 20 to 25 minutes, depending on your desired crispiness. Once your bacon is done you can pat dry with paper towels and then allow the grease to congeal on the parchment for easy clean up. Cooking your bacon in the oven allows you to have more free space on the stove top and frees you up to focus on other items like pancakes or crepes. Also, you are able to keep your grease in one location for use later in other dishes like hot bacon dressing!! Try it this weekend, I think you will find yourself asking, "Why did I not do this before?"

Saturday, February 13, 2010

The Many Shades of Crepes


This morning I had a couple guys over for brunch and decided to make some crepes. I have only made crepes once before so I thought that it seemed like something good to make for a special occasion. I am the type of person who really likes something sweet and savory for breakfast so I wanted to have a little bit of both with my crepes. The crepe is the perfect vessel for both sweet and savory items. Another great thing about crepes is that you can make them ahead of time and then use them when you need them. Although the crepe seems fancy and French, it is incredibly simple and easy to make. I threw all the crepe ingredients into the blender: eggs, milk, flour, water, and butter and blended for a brief 10 seconds. The batter then had to rest for an hour which gave me time to chop up the rest of the components of the breakfast.


For the savory crepes I decided to saute some garlic, onions, mushrooms, peppers, and egg plant. I also wanted to make a mushroom cream sauce for one of the savory crepes because sauce is always a good addition. The cream sauce was a butter, flour, milk, ricotta cheese, a few mushrooms, a bit of onion, and salt and pepper. I melted the butter over medium-high heat in a sauce pan and whisked in an equal part of flour (2T) and whisked continually until the rue was a nice nutty brown color. I added 1 1/2 cups of milk and a half a cup of ricotta cheese and whisked to combine. Once the sauce was hot I added the salt and pepper and allowed to thicken, whisking occasionally. I decided to make a quiche type mixture to fill some of the crepes with. The quiche mixture was 3 eggs, 1/3 cup of milk, some green onion, and some roasted red pepper that I had placed under the broiler.


Once it was time to start making the crepes I heated up my cast iron fry pan and rubbed it with a little butter that was wrapped in a paper towel. This is a great way to spread butter on a griddle without using too much butter and avoiding any burns. I divided my crepe batter in half and added some basil, thyme, salt and pepper to the batter to increase its flavor. I poured out about a 1/3 of a cup of batter onto the hot pan and spread it around evenly. Once the crepe was stiffened up on the top I used my off set spatula to release the crepe from the pan and flip. Cooking the crepe on the second side only takes about a minute. I baked all of the savory batter and simply stacked the crepes on a plate. Half of the savory crepes were placed in ramekins (but you could use muffin cups) and filled with the egg mixture and topped with some cheddar cheese. These little guys were popped in a 350 degree oven for 25 minutes. Once they were done I topped them with some diced red pepper and bacon.


I choose to take the remaining savory crepes and fill them with a little ricotta cheese and roll them up like cigars. These were then topped with some of the sauteed veggies and the mushroom cream sauce. For the sweet crepes I added 1 tsp of pure vanilla, 2 T of powdered sugar, 1 tsp cinnamon, and 1/4 tsp nutmeg. This was spun in the blender to combine. I made and assembled these crepes one at a time. I folded the crepe in half and then placed a small scoop of cream cheese mixture (4 oz. cream cheese, 1/2 T butter, 1 T milk) in the middle and folded the crepe again into a nice little wedge. These sweet crepes were then topped with some warm berries and whipped cream. (For the berries I sauteed some blueberries and strawberries in 1 T of butter until they were soft and then drizzled on about 2 tsp of honey.) I know that the crepe may seem intimidating, but it shouldn't be. You can easily make these French tortillas and impress your family and friends. They are great because you can prepare them ahead of time and simply warm them back up when you want to eat them. Also, you can have a nice buffet line of toppings so your guests can choose what they want on their crepes. I really like to fill some of my savory crepes with goat cheese, artichoke hearts, and mushrooms!! Pancakes and waffles are great, but why don't you try something new this Valentine's Day...MEN!! Candied nuts would make a great addition to these sweet crepes as well. Who doesn't like nuts!!

Friday, February 12, 2010

Compote is not complicated.


This morning I invited a great friend over for some breakfast. After a tough workout and a cold run back to the house I knew that we should have something warm and replenishing. I have really grown sick of maple syrup that is not actually maple syrup and is full of high fructose corn syrup. In an effort to not sweeten my cakes with these sugars solutions masquerading as syrup I opt for fruit or yogurt. I had decided to make a compote to go with the flap jacks this morning. Part of my motivation for making the compote was the cherries in my fridge that needed to be eaten and the pear on the top of my microwave that was not ripening. A little heat can do wonders to hard fruit!!


Of course the first thing in making any compote is to cut up the fruits that you are going to use. In this case I pitted the cherries and simply rough chopped the apples and pear. In a large saute pan I heated up one tablespoon of butter until it was golden brown. I added the fruit and cooked on medium high for about ten minutes stirring occasionally. Once the fruits had started to brown I sprinkled on a little bit of brown sugar and allowed the juice and sugar to caramelize a bit on the fruit. I then turned the heat down to low and added some salt, cinnamon and nutmeg. The salt and nutmeg were about an 1/8 of a tsp each.


This little fruit concoction was a great addition to the cakes and allowed for minimal use of that store bought syrup. I did not add yogurt this morning but you sure could have. Next time you have some fruit laying around that is about to go bad make yourself a little compote. It goes great on about anything, french toast, crepes, ice cream, toast, a spoon!!

Thursday, February 11, 2010

Cakes vs. Cupcakes


Tis the season for love, or at least that is what I say the week of Valentine's Day!! I know that I have been talking a lot about this low/no carb diet that that I have been on with a buddy, but that goes out the window when you make red velvet cake for V-Day. Although the official name of this recipe is Red Velvet, it should be Devil's Food because they are sinfully good. I have made a different Red Velvet Cake recipe a couple of times, but since I was making cupcakes I decided to go with an actual RV Cupcake recipe. The major difference was that this recipe called for oil instead of butter. Most of the cakes that I make use oil for their fat so I was cool with it. Once I made the first batch I knew that the original recipe was better. Since I was not using butter I did not cream the fat and sugar together to make a wonderfully light and fluffy amalgam of fat and sugar. Oil does not have the same whipping ability that butter does, so I knew they would be slightly different. The two significant differences that I found were a slight taste difference (not as rich) and texture. The butter in the original recipe produces this insanely smooth and dense texture that is truly like velvet. You really cannot get enough!! The cupcake recipe was a bit fluffier with larger air pockets in the cakes. I have to confess that I opted to revert to the original recipe so that I could have some of that devilish goodness, plus the first two batches were being exported out of the house for others to consume. You make the best for the ones you love!!


The other difference that I did not mention in the recipes is the flour. I know that many people are intimidated by the variety of options that await you as you peruse down the baking isle. The cake flour, which typically comes in a box, is often overlooked because it is not in a bag. Cake flour is a much finer flour than all purpose flour and has less flour proteins. It is the over beating of flour protein that produces a tough chewy texture. The cake flour allows you to produce an amazing texture that is soft and smooth. You just can't get that with all purpose flour. The thing that you must be aware of though is that you need more cake flour than all purpose flour if you are substituting cake flour in a recipe. I know that cake flour is more expensive, but when you only make these cakes a couple times a year, it is WELL worth it. There are some recipes that you know will stick with you forever. This recipe is one of them. The moral of the story here is that cakes and cupcakes are not exactly the same thing. You cannot say that cupcakes are simply just smaller cakes. The recipes are often different and do not produce the same results. I would say that you just use trial and error, but to say that these RV cupcakes were an error would be a lie. They were amazing, just not AS amazing as the original.


The cream cheese frosting truly the icing on these cakes and I found the dusting of coco to be a nice little addition. A flavor enhancer you might say. Often times it is the little things that make people say, WOW. What can you do to spice up one of your recipes or baked goods? Bake on people!!

Wednesday, February 10, 2010

Not Leftovers...Previously Prepared Pieces


I find it funny that in the sales world we talk about "Pre-owned" items rather than used. Many people have an aversion to leftovers, but previously prepared items have a different ring to them. For lunch today I was looking through the fridge trying to decide what I could eat that would be good and get rid of some leftovers. I decided to combine my Philly cheese steak filling with an egg for a little variation of steak and eggs. As the egg was cooking I noticed I had a little salsa that was made for the Super Bowl. Now we have Southwest Steak and Eggs!!


I guess the one thing that kept coming to the front of my mind was that we need to embrace our leftovers. We are living in a tough economy where we cannot afford to be throwing food away. You have gone to so much work preparing food, don't let it go to waste. I know that some people do not like their food to touch on their plate, but this is different. This is a new dish made with previously prepared items. Sure not everything will play nice together, but that is where you need to use discretion. Trial and error will help you yield the best results. Take a gander in that fridge and see what you might be able to combine together to make culinary magic. I think you will be surprised.

Tuesday, February 9, 2010

Unwanted Guests


Today I finished a wedding cake for a friend. He and his bride had requested that there be a strawberry buttercream in the center of their white cake with white frosting. Making frosting is actually very simple. The key though is controlling the moisture in the frosting in order to regulate the consistency of your spreadable goodness. If your frosting has too much moisture it will be way too thin and not spread the way you want it too. Not enough moisture and it will shred your cake as you try to spread it. For a standard batch of vanilla butter cream frosting I use one stick of room temperature butter, about a bag of powdered sugar, 1 tsp of vanilla, and enough milk to give you the right texture. I had made two batches of my standard buttercream and decided to simply add some diced unthawed strawberries to the party. Although my vanilla buttercream was perfect pre-addition of strawberries, the addition of the unthawed strawberries nearly ruined the frosting. I had WAY more frosting than I needed and did not have enough powdered sugar to offset the moisture that was in the bowl.


In order to fix the problem I had to pull out a large portion of the frosting and then add the powdered sugar to that mix to thicken. This was far easier to do than to keep adding powdered sugar until I had two gallons of strawberry buttercream that was the right consistency! The new, thicker, batch of frosting was a viable option of the wedding cake and resulted in a delicious dessert. The frosting of the cake was a whole other story that I am not going to get into in this blog. The long and short of this experience is that you need to be aware of unwanted guests that may be hiding in some of your ingredients.


Frosting is something that is FAR better when made in your own home, and it is easy to do. Leave the cans on the shelf and get out the mixer. You can make great frosting that is the perfect consistency for any job you have for it. Even if it is eating it by the spoonful!! During this week of Valentines Day frosting would be a great thing for you to try and make and sweeten up your life.

Monday, February 8, 2010

Super Food


As everyone in the world knows, the Super Bowl was last night. In my opinion, the Super Bowl has become a national holiday in the United States that revolves around food, friends, and frivolity. (I would actually say booze for the last one, but that doesn't start with an F). Since I had to work during the game I could not attend the party that I was invited to, so I decided to make a mini Super Bowl feast of appetizers. The theme for my appetizers was easy and delicious. Two great things to have when you have to work, but want to have some great game food. I also had to take into consideration that the carb levels had to be at a minimum, thus the large focus on meat. The menu was: rainbow salsa, little smokies, crab stuffed mushrooms, and Asian chicken legs.

I have to confess that the rainbow salsa was slightly outside the boundaries of my diet, but I went for it anyways. It consists of 1/3 of an onion diced, 3 cloves garlic diced, 1 can of corn (drained), 1 can black beans (drained), 1 can diced tomatoes (drained), 1/3 cup of chopped cilantro, 1 jalapeno diced, 1 small can of green chillies, 1/4 cup of lime juice, and Salt/Pepper. Toss every thing in a bowl and stir.

The bacon wrapped smokies, if you have never made them, are a snap. Simply take some little smokies, wrap them in 1/4 slice of bacon and line in a baking dish. Once the dish is full sprinkle on a generous portion of brown sugar and bake uncovered for about 45 minutes at 350!


The crab stuffed mushrooms were the most involved. I went with large white mushrooms for the mushroom portion. If you twist the stem they usually pop out clean and leave you a nice void for filling. In a bowl I combined 1 pound of chopped imitation crab, 1/3- 1/2 cup of parm, 1/3 cup of cilantro, 1/2 diced green pepper, 4 oz. reduced fat cream cheese, 1/4 diced onion, 1 tsp (or so) of Tabasco, 1/4-1/3 cup of corn meal (since I couldn't use bread crumbs), salt and pepper. This was all mixed together in a medium bowl until it all came together nicely. If it is not sticking together you can add some more cream cheese or just a splash of milk or sour cream. I then took my cookie scoop and scooped up generous portions of the filling and pressed them into the center of the de-stemmed mushrooms!! These were placed in a pan and finished with a little extra parm and baked in a 350 degree oven for about 45 minutes (just like the smokies)!!


The final piece of the menu was the Asian glazed chicken legs. I wanted to do wings, but did not want to buy the large amount of wings in the remaining packages at Cub so I opted for the legs. For time I decided to fry them on top of the stove in my wok. This was my first attempt at frying chicken. I really do not like fried chicken, but I had a hankering for wings and was going to fry them. Had I had more time I would have done them Alton Brown style in the oven. For the sauce I went with my gut. I started with 1 T of butter, 1/4 of an onion finely chopped, 2 garlic cloves chopped over medium high heat to soften up the veggies and draw out some of their flavor. I then added about a cup of soy sauce, 1/4 tsp cayenne pepper, 1/2 tsp curry powder, 1/2 tsp garlic powder, 1/2 tsp paprika, and some fresh ground pepper. I boiled this over medium heat to reduce the soil sauce down and thicken it up. I then added about 1/3 cup of honey and whisked it all together. After reducing it a little further I added a little corn starch and water mix to thicken up the sauce. This was a nice lesson because I added to much at first and had to add more soy and some water to thin it back out. (NOTE TO SELF: Be careful with the corn starch because a little goes a LONG way.) Once the sauce was good I added some sesame seeds and tossed it over the fried chicken legs.


It all turned out really well and left me like most of the country when they went to bed last night, over full!! The next time you are in the mood for some apps or are throwing a party, try something new. Using other people as test dummies is a great idea because they will be impressed by your willingness to risk and enjoy something that they don't usually get.