Wednesday, March 31, 2010

It is the thought that counts


This past week the blog has been dormant because I was in Bozeman Montana with my family and some of our great friends. While we were there it was our friend's birthday. What do you do when it is someone's birthday? You make them a cake. I have found over the past three months that cakes can be made in the most unusual of places and on a whim. You do not need measuring cups and often do not even need all the creature comforts of your own full stocked kitchen. You simply need to be able to adjust on the fly. Preparing things ahead of time is usually a good idea to. For this particular cake I mixed up all of the dry ingredients in a gallon ziploc bag before we left for the trip. I also chose to mix most of the wet ingredients in a small tupperware before we left so I had left to mix once we got to our hotel. As I have mentioned before, parchment paper is great for assuring that your cakes release from their pans, so I made sure to pre-cut my parchment paper and pack that in one of my bags. All I had to do at the hotel was simply mix the wet and dry ingredients together and dump the batter into the prepared pans. It was, well, cake!! Sure it did not look the best when I was done because I was rushed with the baking of the cake and my frosting that I had made at home was a little thick, but it was delicious. A homemade cake is a homemade cake. Not all cakes that you make will be masterpieces. I always tell people, if it tastes good, people will forget about the asthetic imperfections. Everyone should have a cake on their birthday. If you plan ahead, you can make a cake anywhere from a bachelor pad studio apt that is lacking in measuring cups, to a hotel room in Montana. It truly is the thought that counts.

Monday, March 22, 2010

Move over Swiss Miss


Sure we all grew up on the large containers and small packets of the chalky brown powder that claimed to make hot coco. If you were lucky you might get the deluxe packet with the dehydrated marshmallows!! Hot Coco is something that needs to be revered and cherished far more than cracking open a can or ripping open a packet of powder. When you and your kids make the commitment to face the elements, which for some is far less harsh than others, you should be rewarded with a special treat that warms your insides and brings pleasure to your palate. Making true hot coco is simple and can be fun for you and your kids. It also brings far more enjoyment than the powdery solutions that you are used to.


I like to set all of my ingredients out so that I am ready to rock when it comes time to add each ingredient. You start with the sugar, coco, salt, and some water in a sauce pan on medium heat. If you want to get the kids involved they can certainly be whisking this mixture for you while you get the cups and marshmallows out of the cupboard. Once your coco syrup begins to boil you boil it for about two minutes whisking continually. After the two minutes you simply dump in your milk and vanilla, while continuing to stir, of course. Leave the sauce pan over medium heat and whisk occasionally until your coco has reached the temperature that you are looking for.


I personally like to add the mallows to each cup so that everyone can have their own and you do not have to fish for any in the pan. This weekend I ran into a minor problem though, I did not have any mini-mallows for the coco. Solution, whipped cream. Whipped cream is a great staple to keep in your fridge for moments like this. Now I am not talking about anything that comes in a can or that was previously frozen. I am talking heavy whipping cream that you can easily whip into stiff peaks with a little sugar and vanilla for blissful topping of countless foods and beverages. The whip cream melts onto the coco creating this magical froth of lucious goodness. You really cannot get enough. I personally like to add a little coffee to my coco so that I have a makeshift mocha that gives me a little pick me up. Often times being outside can really drain the energy stores. I know that winter is almost over, but making coco is something that can be great in the Spring to when you are out grilling on chilly evening. You do not have to keep settling for the can of powder or the overpriced mochas from your local coffee shop. You can make gourmet coco at home and impress those kids one more time!! The great thing about coco too is that you can add little candy treats to it if you want to break out of the norm. Andes mints make for a mean mint coco and melt very easily in your hot mix.

Sunday, March 21, 2010

Leeked


Leeks are one of those vegetables that you look at and wonder, "How might I use these in every day cooking?" They pop up on cooking shows and in food magazines as this extra special vegetable that has powers the common chef is unable to handle. The reality is, the leek is just like an oversized green onion. Just look at them. They are not hard to prepare, like an artichoke, nor are they above your culinary abilities. I have found over the past week that the leek is a great substitute for any onion and can bring a slightly different flavor profile and texture to your dishes.


I chose to simply dice one up and use it in an omlelete on Saturday morning and in some breakfast fajitas this morning. These cousins of the onion provide a great look in your dish because of their unique rings and green color. I just think there are so many vegetables, and foods for that matter, that we shy away from cooking with because of the mystique that can surround them. The leek is not scary and is very versatile. I used it in my chicken stock, a salad, and for a couple different breakfasts. I encourage you to reach outside of your comfort zone, especially in this economy, and find alternatives to the staples you typically gravitate towards. The leek, like the eggplant, is something that should not scare you. You can do it. Impress your friends and delight your taste buds. Chop chop!!

Friday, March 19, 2010

Culinary Irony


Monday is a friend's birthday. It has been one week since I tried to ship my first birthday cake. The first attempt was a disaster. Although I had received word that it made it in one piece, I was mistaken. The friend who I made this cake for is a big fitness fanatic like myself. He is also the one that I joined in the low carb/no carb challenge back in January/February. This cake is laden with irony. He and I both love our fitness and dream of being ripped some day, but we both enjoy our desserts.


One thing that I learned in making this cake was that off brand no-stick is not as effective as name brand no-stick. There is nothing worse than making a beautiful cake that will not release from the pan. All of your hard work can be ruined in a single flip of your cake. I usually choose to spray on no-stick and flour my pans, but for some reason I skipped that step this morning. Never again shall I skip that step. The reality is, the best way to assure the releasing of your cake is to use parchment paper on the bottom of your pans. Parchment is a guarnateed release for your cakes. Obviously, when you are using shaped cake pans it can be difficult, but it can work.


This cake is another example of carving addition pieces of cake to create the look that you are going for. The pecks and abs were made out of cake that I had baked in ramikens and simply cut into the pieces that I needed. It is always better to have a little extra cake in case you need to make repairs and of course, to sample!! When you are adding additional pieces of cake you will need to make sure that you get a nice crumb layer on the cake before you attempt to put your final layer of frosting on. Cakes do not have to be outrageously complex to mean a lot to the recipient of the cake. Try a few additions and practice your crumb layer. The more cakes you make, the more daring you will become. Trust me, you cannot fail when making cake!!

Thursday, March 18, 2010

Granola Head


Granola is one of the most expensive cereals on your local grocers shelf. Those of us who love granola will often breakdown and pay the higher price for a superior breakfast, but we don't have to pay the price by eating store bought granola. I think that some people are perplexed by granola because of the nice large sweet chunks that they are accustomed to in their box granola. I have found that you can make superior granola at home without all of the fillers and for much cheaper. Any time that you make something for yourself you have ultimate control on what goes into the recipe and what is left out. Making your own granola allows you to control the sugar, oil, and salt content. Also, you do not have to include those cheap fillers like rice cereal that many of the leading granolas do.


Here is the method to my granola madness. I dump in about a half a box of Old Fashioned oats into a large bowl. To that I add 2 cups of chopped almonds and 2 cups of chopped walnuts. You can certainly add pecans if you have them. I did not have any when I made this batch, thus they did not join the party. I added some oil, honey, a little brown sugar, salt and cinnamon. The oil and honey pull everything together and help in the browning of the oatmeal. I usually add some maple syrup to the mix as well, but chose not to for this particular batch. As for the oil, I used a mix of vegetable oil and EVOO. Granola is supposed to be healthy and good for you, so the EVOO helps retain the health factor. All of this is mixed together to combine. I spread a thin layer of EVOO over a cookie sheet and spread the oat mix evenly over the sheet. All of this goes in a 275 degree oven for a half an hour.


After the 30 minutes I stirred the oat mixture and placed it back in the oven. Repeat the 30 minutes of cooking, along with the stirring until your granola has reached your desired color. I like to add a little more honey, some cinnamon, and some nutmeg for the last 30 minutes of cooking. Once the granola is good to go, remove it from the oven and place it back in your large bowl so that you can add your dried fruits and coconut, if that is your desire. Customization is key with granola. Make it exactly how you want it. Stop settling for store bought granola and make up exactly what you want. You will not regret it. The hardest part of making granola is not eating it all. Serve it up on some yogurt, ice cream, or just with some milk. It is hearty, healthy, and delicious.

Wednesday, March 17, 2010

Cooking Kids


Children love to be in the kitchen. From the time they can pull things out of the cupboards and bang the pots and pans around, kids just love to be in the kitchen. Some kids have more of a passion for being up in the cooks business, I mean helping, than others. My children both enjoy to cook and be in the kitchen, but my son Wyatt is far more passionate about being a part of the cooking experience. I know that most of his fervor comes from his working spirit, but nonetheless, he loves being right on your hip in the kitchen. The kids have been cooking in the kitchen with me since they could stand on a chair.


I am a firm believer in getting your children cooking young so that they are more open to trying new foods and can spend that time with you, rather than losing more precious minutes at the end of an already time starved day. I started by having them help me measure or simply turning on the mixer. Things have progressed to the cracking of eggs and the pouring of ingredients into the bowls. Typically, we divide ingredients so that one will get the wet ingredients and one will get the dry. This does not always come out to exact equality, but they don't usually get it.


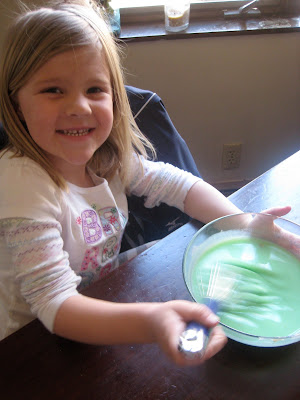
There are times when I know that the kids cannot help me with a particular portion of cooking and it is at these times that I try and encourage them to help in some other way. "Could you throw away this?" "Could you grab me that?" "Could you set the table?" I have come up with tasks that I know they can do and actually be helpful. The latest one for Wyatt is cutting the avocados for guac. He loves to cut the green goodness into tiny little pieces. It is great because he can use a butter knife and it keeps him occupied for a long time. Mattie loves to stir. The thing that I have found with them stirring is to use an extra large bowl and make it a metal one.


I see cooking and kids a lot like kids and art. You have to allow them to get a little messy and encourage them every step of the way. Sure you are going to get some egg shells in your bowl, but that is why you have them crack the eggs into a separate vessel so you can pick the shells out. Cooking is supposed to be fun and bring families together. Take a deep breath and get creative the next time your little one starts pulling a chair over to the cutting board. Everyone can cook, even kids. Have fun and cherish those times. They will be gone before we know it!! I know that if it was not for my mother I would not be the cook I am today. Thanks Mom.

Monday, March 15, 2010

Custom Stock


Stocks are something that can be used in a myriad of ways: deglazing pans, the base for a sauce, soup, and the list goes on and on. The thing with stock is that it is easy and can utilize things that you would most likely throw away. Furthermore, you can customize your stock to work better with different dishes. Today my stock is for some Roasted Pepper and Sausage soup. The base of this chicken stock is the deboned chicken from a roasted chicken that I made for a different meal. Since I knew that I was going to be using these chickens for this particular stock I added some paprika and cumin to them for roasting.


Once the chickens were roasted and removed of their tasty meat I chopped up 1 leak, three carrots, 1/2 a white onion, and the inner 6 ribs of celery (with their leaves). I heated up about 2 T of EVOO in a large stock pot and added all the veggies to the pan. I sauteed the veggies for about 4 minutes before adding the chicken bones, skin, and water. I do not measure my water for the stock, I simply fill the pan within an inch of the top. The stock mixture was brought to a boil and then reduced to a simmer. This concoction simmered on the stove for a 4 hours to provide maximum time to extract all the goodness from the chicken and veggies. You certainly do not have to simmer for this long, but if you have the time you might as well use it.


To separate the stock from the rest of the goodies in the pot I simply placed a large strainer over and bowl and dumped the stock out of the pan. The veggies in the pan can be saved and used in a future soup, eaten alone, or tossed into the compost pile!! If you are not going to use all of your stock you can freeze it in 1 or 2 cup blocks and keep in the freezer for future use. When you freeze them in pre-measured amounts you are able to skip a step on your next dish. I know that stock can easily be purchased in a can or a carton, but it is cheaper and tastes better when you make it in your own kitchen. You get to decide what goes into the stock and can regulate things like sodium content. Try it, I think you will like it. Happy cooking!!

Sunday, March 14, 2010

Flying Cake


Many people have asked me to ship them cake. I have been very leery of shipping cake because of the time that it takes to get anywhere and the fragility of my cakes. Over two years ago I started my experiement in shipping my goodies. The first thing I shipped was a pecan pie to a friend in Dallas, and it was a success so I thought that I would branch out a bit. This year for his birthday I sent him a simple two layer cake. It was more about the flavor of the cake than the look so I thought it was a great trial. Yesterday I shipped off my first fully decorated and shaped cake!! Steve is a wicked good skier who lives part time in Alaska flying helicopters and skiing the backcountry of The Last Frontier. When he is not in Alaska or jet setting around the world he is ripping up Summit County, so I only found it fitting to send him a skiing themed cake.


I knew what I wanted the general shape of the cake to look like but was not certain how I was going to arrive at that shape. After putting together a few dry runs of pans I ended with an 8 inch round, a 6 inch taller round, and 2 8 oz ramikens. I felt this would supply me with a great shape that I would only have to carve slightly. I hate to carve off too much cake because then you just end up eating it yourself!! After the carving was done, I spread a nice thin crumb layer on the cake to seal everything in. Once the crumb layer was complete I put the cake in the fridge to allow it to cool and stiffen up.


The frosting job is very simple, but that was the point. I did not want to put eight hours into a cake that may end up in a crumb pile. The brown spots on the cake are to signify large boulders and cliffs that you might see above the treeline in the backcountry. With a pastry bag and a tip I made a few evergreens to fancy up the bottom of the cake. The interesting thing is that I had sprinkled on some coconut near the bottom of the cake to give the appearance of fresh snow. Well frosting does not like to adhere to coconut that is loose on the side of a cake. So, I had to carve out a little spot in the frosting for the trees so that they could stick to other soft frosting and not simply slide down the mountain. I will not see how the cake looks until next week, but I feel good about the effort and its chances.

Birthdays are such a big thing to me. It is the one day that you are celebrated by yourself and I have always wanted people to know how much I value them and appreciate them on their birthday. I started making birthday cakes for friends nine years ago. The first few were disasters, but the more I practice, the better they seem to get. Lets face it, it is always the thought that counts. Besides, who doesn't like to get something in the mail on their birthday?

Saturday, March 13, 2010

You have to like your options!!


Let me just say that the last few batches of photos have been with my less than stellar camera and it has me very frustrated. Food is something that when you see it in a photo it should make your mouth start to water. You should immediately think, "Man I need to get me some of that!!" This dessert is one of the easiest desserts to make and can be a quick "throw together" kind of dessert with staples that you may have in your kitchen. Trifle is any dessert that is made with cake, whipped cream, some sort of custard/pudding, and an additional component. Many people like to use fruit in their more traditional trifles, but I like to use candy. Any excuse for me to incorporate things like peanut butter cups and I am all in. One thing that you will find when you make cakes is that sometimes they will not come out of the pan the way you would like them to, or you are left with lots of shavings/chunks. I take all of these pieces and freeze them for later use in my trifles. This particular trifle though I wanted to make a new cake recipe so I decided to use whole cake. I baked up a chocolate pound cake that I thought would be more apt to soak up some of the moisture from the pudding and whipped cream.


Once the cake was baked and cooled I whipped up some heavy whipping cream and made my chocolate pudding. The pudding was instant and came from a box. I have made homemade pudding before and just do not think that it is always worth the hassle. You have to pick and choose the things that you take shortcuts on. The whipped cream could definitely be substituted for Cool Whip, but I am a HUGE fan of regular whipped cream. It is quick and easy if you have a mixer and it tastes much better. Once the cake was cooled I placed my trifle vessel on top of the cake and pressed down slightly to leave indentations for cutting out the cake. You want to cut the cake so that it barely slides into the vessel you are using, as to not leave room for spill over when you layer. I also cut my cake in half so that I expose the inside of the cake. This is another way to increase moisture absorption. Then you simply layer. Cake, pudding, whipped cream, candy/fruit...repeat! The combinations for trifle are endless. For St. Patties Day you could make chocolate cake, mint pudding, and crushed Andes mints. For Christmas I have made a triple chocolate peppermint trifle that is out of this world. Fourth of July this year it was red velvet cake, white chocolate pudding, and blueberries. The versatility and ease of this dessert make it a must have in your culinary quiver!! Happy baking.

Friday, March 12, 2010

Jarhead


I have been a jarhead for all of my life. When it comes to spaghetti, the sauce always came from a jar. Sure we might add some ground meat and additional spices, but the main saucey component was straight out of a jar. This week I changed all of that. We were helping put on a Italian dinner tonight and I thought it was a perfect time to make a homemade sauce. If you read my post on roasted pepper soup, you know that the broiler can do wonders to vegetables, especially in the winter time when you do not have as easy access to a grill.

Here is how this sauce all came together. The first thing that I did was took about 12 roma tomatoes and seeded them. The seeding is process is quick and easy. Slice your red plump buddies in half and then either squeeze them or give them a quick slice down the centers of each tomato. This will save you from having an overly seedy sauce later.


These tomatoes were placed in a large bowl with one chopped white onion and 6 crushed garlic cloves. Add a tablespoon or two of olive oil and toss to coat. I then added about 2 tsp of sea salt and 1 tsp of black pepper. All of this was placed in a large baking dish and broiled for about 45-55 minutes. Once removed from the oven I allowed it all to cool before tossing it in my blender.


While the tomatoes, onions, and garlic broiled I browned up 16 oz of Italian sausage. I have used ground beef and ground turkey, but this recipe was going to be special, insert sausage here!! The Italian sausage brings such great flavor and texture to the party that you may have a hard time going back to your typical ground meat. I think a great compromise is to use a 50/50 blend of sausage and turkey.

Now, in a large stock pot I cooked up two strips of bacon that was cut into small chunks. Once the bacon was removed I added 3 diced cloves of garlic and 1/4 of a diced oninon to the bacon drippings and cooked them until they were nice and golden. To this I added one can of diced tomatoes and green peppers along with a large drained can of whole peeled tomatoes. I cooked this for about five minutes stirring occassionaly while I placed the roasted veggies in a blender. Once the roasted veggies were taken for a spin on "liquify" I removed them to make room for the veggies that were cooking on the stove. The whole and diced tomatoes, along with the onion and garlic were pureed in my blender and then added back to the pan with the other pureed veggies and sausage. I brought the sauce up to a boil while adding 2 tsp of dried oregano, 2 tsp of dried basil, and 6 bay leaves. Once the sauce reached a boil I turned the burner down to simmer and allowed the sauce to simmer for 4-6 hours stirring occasionally. You certainly would not have to simmer it for this long, but if you have the time you might as well. I did not add any additional salt and pepper because I felt that it was right on with the saltiness of the bacon and the sausage.


Most believe that making tomato sauce should be left to those living in the boot across the pond while the rest believe that "making spagehtti sauce" is opening the jar and adding some meat. You do not have to live the rest of your life thinking that homemade sauce is like homemade cakes, they come mostly made in a package at the store. Step out on a limb and you can change the way you and your family eat pasta. Summer is just around the corner and what better way to use those tomatos than in a hearty sauce that you can can or freeze. As always, happy cooking!!

Thursday, March 11, 2010

"The Best..." Really?


One of my favorite parts of the movie Elf is when Buddy goes into the cafe and congratulates them on, "having done it!" They claim to have "The World's Best Cup of Coffee." How often do you see eateries advertising, "world famous/award winning/best" fill in the blank? After driving across half of the country one winter recruiting for a camp in New Mexico my friend and I noticed that every town has a "Best" whatever that they try to use to lure you in. How do you really know that this place has the best pancakes, chicken, or quesadillas? Chances are you don't and you can make a better version of whatever they are claiming to have perfected.

The quesadilla is one of those go to staples that you can easily whip up in a pinch and satisfy the masses. Most people seem to have a few tortillas hanging around the fridge or pantry and everyone has cheese in the fridge. With a few fridge additions you have yourself a nice little meal that is going to be better than "the best" quesadillas you are going to find out on the town. Yesterday for lunch I opted to make some three cheese quesadillas with some turkey and hard salami. Who says that you have to always use steak or chicken? I think that when you look at the leftover fajita meat in the fridge you don't have to settle for a repeat of Tuesday night.

I think the quesadilla key is spreading a thin layer of butter on your pan before adding the tortillas so that you get that little brown crispy goodness on the outside of your flour (or corn) packaging. Think about sprinkling a little paprika or cumin on top or your cheese with a squeeze of lime. If you add some yellow rice, maybe some black beans and chips you have yourself a meal. Don't waste your time or money ordering quesadillas out on the town when you can make better ones in your house. Play around, have fun, and spice up your night!!

Wednesday, March 10, 2010

Mix it Up


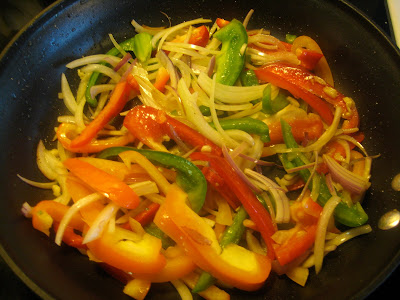
If variety is the spice of life, then it is also the measure of a good salad. Last week I put together a pretty killer Italian chicken salad with a great mix of greens, veggies and cheese. In an effort to expand outside of my typical romaine lettuce box I purchased some arugula. The salad started with some sliced red and green peppers, red and white onion, poblano pepper, and some mushrooms that I had cut into 6ths. These veggies were sauteed up in some EVOO and placed to the side to await inclusion into the salad party.


For the chicken I pounded it out nice and thin before dusting it with some basil, oregano, salt and pepper and then cooked it in some EVOO. I think that it is good to have more surface area for a chicken salad so that you can spread the chicken to as many bites as possible. I let the chicken rest for about 5 minutes and then sliced it thin.


For the lettuce mix I opted for some chopped romaine, a few mixed greens, organic spinach, and some arugula for great texture and peppery undertones. The greens were all tossed into a bowl and topped with the veggies and chicken. To finish off the salad I added a little light Italian dressing with some mozzerella and parmesan cheese. The heat from the veggies and chicken melted the cheese slightly and made for one delicious salad. Salad does not just have to be something you eat to feel good about the rest of your meal. Salads can be fun and exciting with countless flavor combinations. From one who didn't start eating salad until recently, trust me, salad can be the best meal of your day. The key is to just mix it up!!
Tuesday, March 9, 2010

Taco Tuesday


First off I must apologize for taking a week off from posts. I am going to make it up by posting a little extra on particular days. I was preparing for a long trip to Little Rock Arkansas to run a marathon and the blog had to be placed on hold. Last Tuesday I make tequila lime steak fajitas. Fajitas are something that most people love to order when they are out to eat, but rarely make at home. One thing that I love about making something that you have to marinade is that your food is working for you as you are working for yourself, and your family!! In a large freezer bag I dumped half of a lime (juiced), 2 oz of tequila, paprika, cumin, 4 cloves of garlic (crushed), 1/4 of a red onion, salt, pepper, chili powder, half a jalapeno, 1 ancho chili (diced), 1/2 a poblano, some cilantro, and some cayenne. I tossed in a 20 oz top sirloin and allowed it to marinate all day while I was at work.


Once I got home from work I placed the steak and the marinade in the freezer while I prepared the veggies. Fajita veggies can really be anything you want them to be, but traditionally it is just the mixed peppers and onions. Simple, simple, simple!! These veggies were sauteed in some EVOO before being finished off with a little of the marinade. Of course I cooked the marinade and the veggies so that it would kill off any of the meat juices that you would not want to consume raw.


I took the meat out of the freezer and sliced it nice and thin. The freezer helps to firm up the meat so that you can slice it thinner without adding any of your own meat to the mix. When you have sharp knives, which you always should, any good chef can slip and slice their digits!! The meat was sauteed in a hot pan with some EVOO. I made sure not to over cook the meat because I HATE tough fajita meat. Medium-rare is my desired doneness, but for you it might need to be a bit darker.


One key to great fajitas is to heat your tortillas. Toss them in a hot pan with a little butter and heat for about 20 seconds on each side...MONEY!! Also, what are fajitas without some great guac?!!? In my world, every Tuesday should be taco Tuesday!! Fajitas do not have to just be something that you get when you go out to eat on a steaming platter. You can make better fajitas at home. Trust me.

Monday, March 1, 2010

Sandwiched


I have been eating sandwiches for, well, all my life. I was the kid who would always pack a lunch, even in high school. Hoagie bun, turkey, and colby jack cheese. No mayo. No butter. No frills. Straight up dry sandwich. I think that a lot of people have stigmatized the sandwich and will not allow the sandwich to play a lead roll at their dinner table. I, on the other hand, love the hot sandwich at dinner time.


I think that the key to making the sandwich a success is to have a variety of options to go with your meat and bread. The more options that you bring to the party, the better your party will be!! Tonight I sauteed up some mushrooms, onions, and garlic to go with the avocado, tomato, lettuce, bacon, and smoked gouda. Once everything was ready I simply took orders and assembled the sandwiches to order.


Each slice of ciabatta was blessed with a skiff of butter before going on to a hot pan and topped with my kitchen brick. The brick helps to not only speed up cooking, but it also helps to hold all of the sandwiches together. The problem that you may run into is that the second side will often cook faster than the first, so cooker beware. When you add something like a smoothie and a hot vegetable you have a great dinner. Tonight I just sauteed up some frozen green beans in some of the leftover bacon grease and added a bit of yellow pepper and onion to the mix. You will order a sandwich at a restaurant, why won't you make it for your dinner at home?!!?